![]()
Special Project: Making the Pixie
The Digital Scene II
After the photography was done, the slides were scanned, and the digital scan files were prepared for import into the Bryce model. Each scan needed a "transparency mask" - this would allow the scan to have transparency in those parts that did not show the figure. The masking of the figure was done using manual painting tools in Adobe Photoshop software. The result was that the photo panels imported into Bryce were conceptually similar to those free-standing cardboard-backed life-size celebrity posters one sees at store displays.
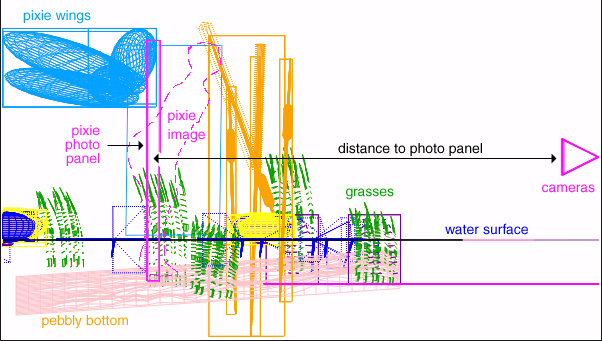
Each of the imported photo panels represented a left and right view, respectively, of the figure. Together they produced the three dimensional image of the figure in the scene. For this to work properly, the renderings in the Bryce model had to be set up to perfectly match the taking geometry of the figure photography: the virtual cameras used within Bryce had to have the same effective focal length, and scale interaxial separation and distance from the figure, as had been the case during the figure photo session.(figure 3).
Figure 3. Wireframe plan view of Bryce model.

Despite the assistance of notes taken during the photo session, this task of matching the taking geometry was more demanding than anticipated. Ongoing even to the last, it involved seemingly unending software parameter fiddling.The apparently seamless integration of the photo objects into the scene was to be enhanced by the figure image interacting with a digital surface of water. Although I had shot several different poses for possible use in this project, I settled on a standing pose with the idea that the pixie would have her feet underwater, standing in a shallow pool. This would create the opportunity not only for a realistic reflected image, but also a transmissive image of the feet below the water.
This pose also forced the definition of parallax between the two panels. For simplicity, both the left and right panel were to occupy the same spot in the left and right rendering. Therefore, because the Pixie's pose placed the feet near the "rear" of the three dimensional image, and because the feet were to be an important
point with the rest of the scene (in contact with the digital water), parallax at the feet needed to be close to zero. Consequently, most of the remainder of three dimensional image displayed positive parallax, placing it almost entirely in front of the actual imported photo panels (figure 4).
Figure 4. Wireframe elevation view of Bryce model.
This caused a problem when it came time to attach the wings onto the shoulders of the pixie. Again, to enhance the illusion of realism, I made the wings actual spheroidal objects within the Bryce scene. So that the wings appeared properly placed and attached to her back, between the shoulderblades, they had to be placed _in front of_ the photo panels. This was problematic, because it would disturb the rendering of the photo panels' images (the wings would block the panels from the point of view of the virtual cameras). Instead, I was forced to keep the wings physically behind the panels, and manually change the horizontal position of them between the left and right scenes. This introduced the parallax necessary to make the wings appear in front of the panels, without actually blocking the rendering of the panels' image of the figure.The transmissive image of the feet under the water was beset by other problems. Here I found it difficult to set the transparency and refractive index of the water such that the feet looked submerged, while at the same time keeping the pebbly ground underneath the water properly visible. In the end, I was forced to abandon my effort to reconcile these two requirements, and instead created two more photo panels showing only the feet. These I colored a darker blue using Photoshop, then imported separately and scaled down vertically in Bryce to give the impression of submersion and refraction that I wanted. (The alert reader will recognize that I had to produce and import new panels for the pixie above the water at this point, where the feet were missing.)
But the final effect was worth the trouble (Figure 5). The resulting image shows a multitude of depth levels involving the figure of the pixie and the surrounding environment - a convincing integration. In one small area of the composition, one sees at different depths the reflection of the pixie's wings, the bottom of the lake, the submerged feet, the rippled surface of the water, and rising above that, the figure of the pixie herself.
Next: The Finishing Touch, and Epilogue
Figure 5. Cross-eyed stereo pair detail view of the final rendering showing multiple depth levels.

|- H o m e -|- P o r t r a i t s -|- T E C H N O B O T -|- C O M W O R K -|
Unless otherwise noted, all contents of this page, individual or
aggregate, are copyright 1999 Boris Starosta.  All rights reserved.
Unauthorized duplication is a violation of applicable laws, and is
destructive of free enterprise, creative expression, and the human
spirit.

All other product names mentioned in these pages are used
for identification purposes only, and may be trademarks or
registered trademarks of their respective companies,
and the exclusive property of their respective owners.